Refine Skill content is free. When you purchase through referral links on our site, we earn a commission. Learn more
You have come to the right place, if you are looking forward to integrating Infusionsoft webform to Divi theme, make it look nicer, and validate the required fields before submitting. Refine Skill has prepared the simple to follow stepwise guideline which will guide you to integrate Infusionsoft webform to Divi theme. There are several ways to integrate the Infusionsoft webform to the Divi theme, but we will follow the manual style. This guideline will help you integrating and validating the Infusionsoft web form without using any WordPress plugin.
Integrate Infusionsoft webform to Divi theme without using plugins
Note: In this example, we’ll be using First Name, Last Name and Email as mandatory fields to demonstrate the integration. Adjust the code accordingly, if you have other mandatory fields. If you have some basic knowledge of CSS and JavaScript, you can easily follow the guideline and adjust the code on your own.
Step 1: Copy the unstyled HTML code
Login to your Infusionsoft account. Navigate to Marketing -> Campaign Builder and click on the campaign where you’ve added the webform. When you are in the campaign canvas, click on the webform. It may look something like this in the image (the name might be different).
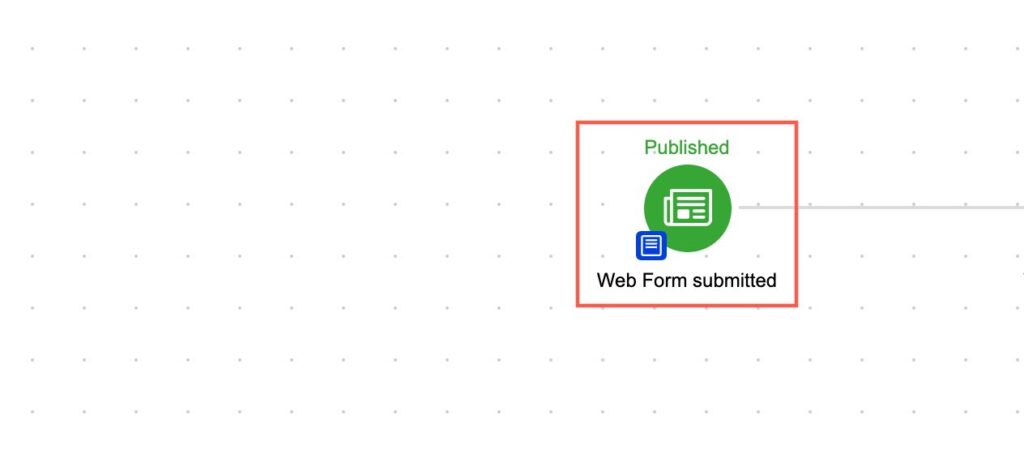
It’ll take you to the Web Form detail page in the Design tab.
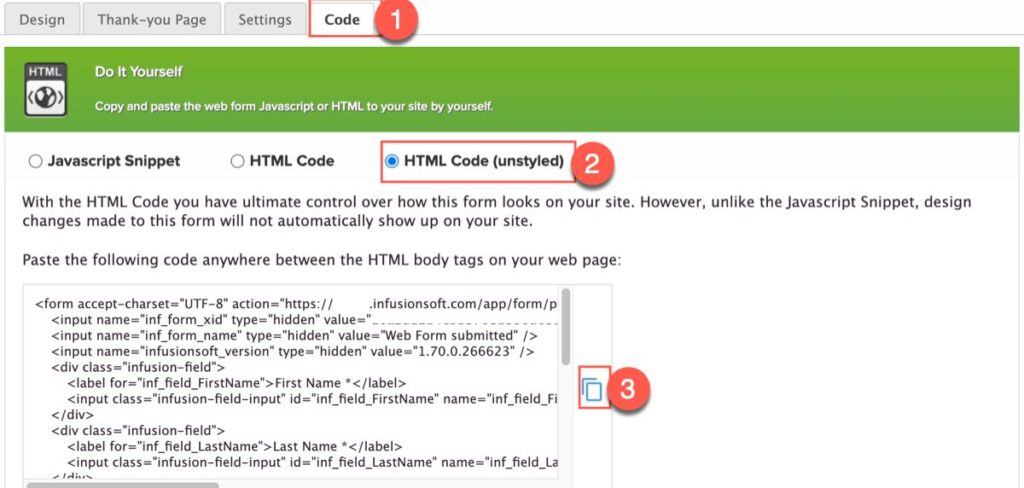
Now, Click on Code tab, select HTML Code (unstyled) and click on the Copy icon, that will copy the HTML snippet in clipboard.
Open any text editor and paste it over there. We’ll adjust few things on the input boxes and the label for the mandatory fields. What we’ll do is to add * in different colors so that the user will see it as a mandatory field at first glance and add a class on each of those divs.
Replace the following part of the code
<div class="infusion-field">
        <label for="inf_field_FirstName">First Name *</label>
        <input class="infusion-field-input" id="inf_field_FirstName" name="inf_field_FirstName" placeholder="First Name *" type="text" />
    </div>
    <div class="infusion-field">
        <label for="inf_field_LastName">Last Name *</label>
        <input class="infusion-field-input" id="inf_field_LastName" name="inf_field_LastName" placeholder="Last Name *" type="text" />
    </div>
    <div class="infusion-field">
        <label for="inf_field_Email">Email *</label>
        <input class="infusion-field-input" id="inf_field_Email" name="inf_field_Email" placeholder="Email *" type="text" />
    </div>
with the following code. If you have any other mandatory fields, follow the same pattern.
<div class="infusion-field firstname">
	<label for="inf_field_FirstName">First Name <span style="color: #ff6600;">*</span></label>
	<input id="inf_field_FirstName" class="infusion-field-input-container" name="inf_field_FirstName" required="" type="text" />
</div>
<div class="infusion-field lastname">
	<label for="inf_field_LastName">Last Name <span style="color: #ff6600;">*</span></label>
	<input id="inf_field_LastName" class="infusion-field-input-container" name="inf_field_LastName" required="" type="text" />
</div>
<div class="infusion-field email">
	<label for="inf_field_Email">Email <span style="color: #ff6600;">*</span></label>
	<input id="inf_field_Email" class="infusion-field-input-container" name="inf_field_Email" required="" type="text" /></div>
<div>
Step 2: Paste the code to Divi code module
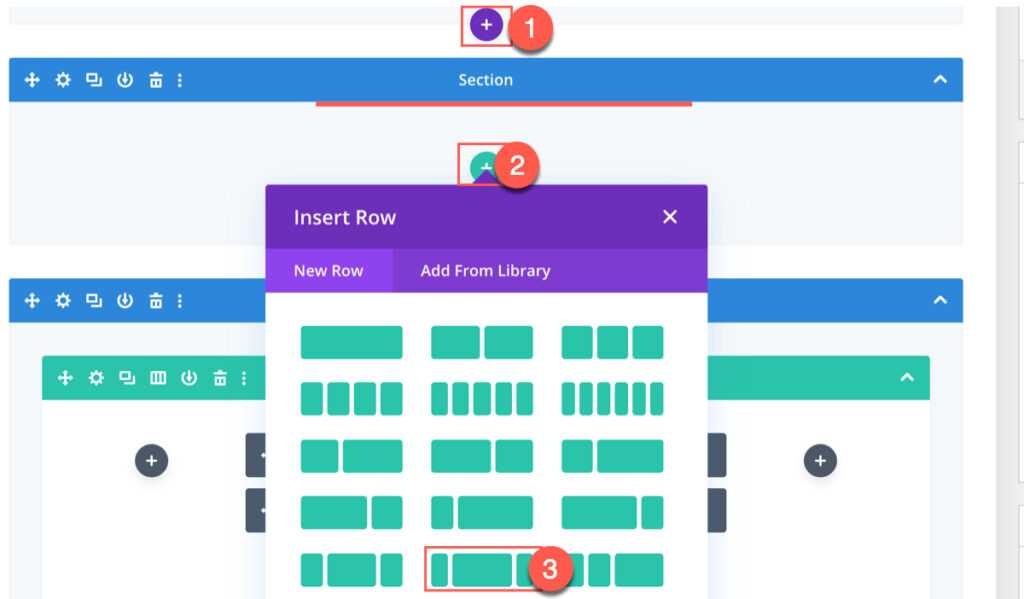
Now, copy the entire code. Goto your website into edit mode. Add a regular section and in the Insert Row section popup, choose a section according to your preference. In this example, we will choose 3 column section with (1/4, 2/4, and 1/4) column width. This way the form will appear in the center of the page with some space in the left and right.
In the middle section, add Code Module and paste the code that you’ve copied there and click save (button with tick mark). Now, you have added the webform to the website successfully.
Step 3: Add Validation CSS
Since we would want to define the error label and deactivate the button in case of errors, we will add some lines of CSS on the page.
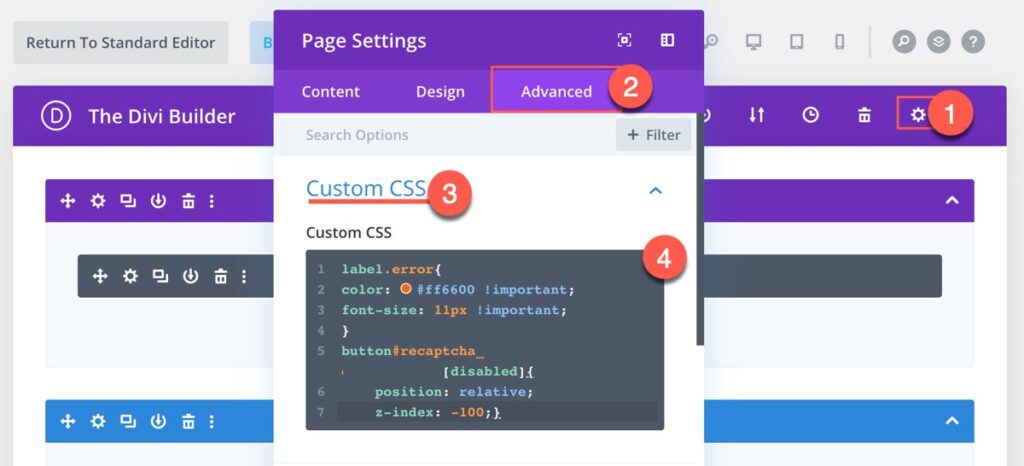
To add the code, click on the gear or settings icon on the Divi Builder, it’ll prompt the page settings. Now click on the Advanced tab and then Custom CSS. It’ll open up the Custom CSS input box where you’ll paste the following code. Before pasting the code, replace the text yourbuttonid with the button id of your Infusionsoft webform in line number 5. The button id starts with recaptcha_
label.error{
color: #ff6600 !important;
font-size: 11px !important;
}
button#yourbuttonid[disabled]{
    position: relative;
    z-index: -100;
}
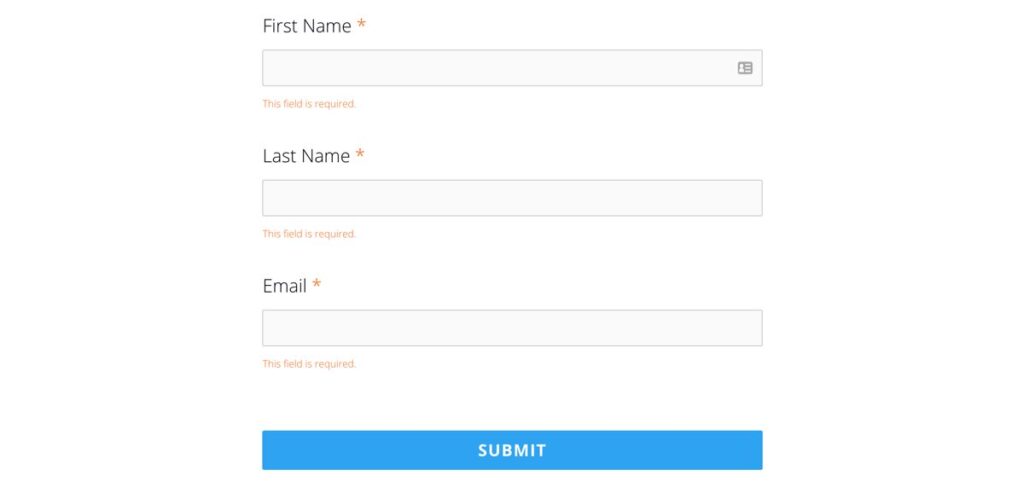
Step 4: Form Styling
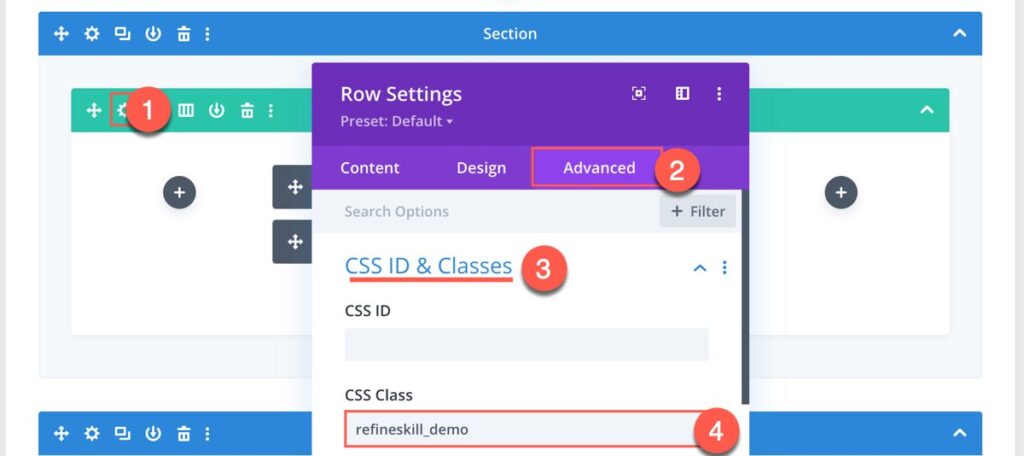
Since we would want to style the form a bit, we’ll add some CSS to define the width for tablet and mobile view too. To do so, add a CSS class to the row that you’ve added. We will use it to style the form and its elements in the next step. To do so, click on the row settings, click on Advanced Tab and then CSS ID and Classes. Give a meaningful name so that you can replace that in the CSS code. In this example the class we’ve given is refineskill_demo.
To style the form elements, add the following code to the Divi Custom CSS. To add the custom CSS code, navigate to Divi -> Theme Options and scroll down to the bottom of the General Tab and paste the CSS code. Make sure that you have replaced the refineskill_demo with the correct CSS class before pasting it.
.infusion-field {
   float: left;
   width: 100%;
   margin-bottom: 25px;
   color: #000008;
   font-size: 18px;
}
.infusion-field label{
   font-size: 20px;
}
.infusion-field-input-container{
    width: 100%;
}
.infusion-field input[type="text"] {
   margin-top: 10px;
   border-radius: 2px;
   background-color: #FAFAFA;
   height: 40px;
}
.refineskill_demo.firstname,
.refineskill_demo.lastname,
.refineskill_demo.email{
   width: 49%;
}
.infusion-submit button{
    color: #fff;
    background-color: #2EA3F2;
    border: none;
    font-weight: 700;
    letter-spacing: 1px;
    text-transform: uppercase;
    padding: 13px 29px;
    line-height: 17px;
    font-size: 18px;
    cursor: pointer;
    transition: .25s;
    border-radius: 2px;
}
.infusion-submit {
    text-align: center;
    clear: both;
  }
@media (max-width: 480px){
  .infusion-submit button{
    width: 100%;
  }
}
.infusion-submit button:hover,
.infusion-submit button:focus{
  background-color: #2EA3F2;
  border-radius: 2px;
  transform: translateY(3px)
}
.infusion-submit button {
    width: 100% !important;
}
.infusion-field input[type="text"]{
  border-color: #ccc;
  background-color: #FAFAFA;
}
.infusion-field input[type="text"]:focus{
  outline-color: #2EA3F2;
  border-color: #2EA3F2;
}
@media (max-width: 768px){
  .infusion-submit button{
    width: 100%;
  }
}
@media (max-width: 767px){
  .refineskill_demo.firstname,
  .refineskill_demo.lastname,
  .refineskill_demo.email{
   width: 100%;
  }
}
Step 5: Add JavaScript code for form validation
Now the only thing remaining is to add the JavaScript validation To do so, right below the code that you’ve added earlier, add a code module and paste the following code. Make sure, you replace yourformid with your Infusionsoft form id. Infusionsoft form id starts with inf_form_ and replace the recaptchaid with your Infusionsoft recaptchaid. Recaptchaid starts with recaptchaid_. In both cases, you just need to replace the id only as the code already contains inf_form_ and recaptcha_ and click save (the tickmark button).
<script type="text/javascript">jQuery.fn.getVelidationMessage = function(){
	var message = "";
	var name = "";
	this.each(function(){
		if(this.checkValidity()==false){
			name = (jQuery( "label[for=" + this.id + "] ").html() || this.placeholder || this.name || this.id);
			message = message + name +":"+ (this.validationMessage || 'Invalid value.')+"\n<br>";
		}
	});
	return message;	};
function loadjScript(url, success){
	var script = document.createElement('script');
	script.src = url;
	var head = document.getElementsByTagName('head')[0],
		done = false;
	head.appendChild(script);
	script.onload = script.onreadystatechange = function() {
		if (!done && (!this.readyState || this.readyState == 'loaded' || this.readyState == 'complete')) {
			done = true;
			success();
			script.onload = script.onreadystatechange = null;
			head.removeChild(script);
		}
	};
}
jQuery(document).ready(function () {
	var isFocus=false;
	if (typeof jQuery.fn.validationPlugin !== 'function') {  									loadjScript('https://cdnjs.cloudflare.com/ajax/libs/jquery-validate/1.17.0/jquery.validate.min.js', function() {
		jQuery('form#inf_form_yourformid').validate({
			rules:{inf_field_FirstName:{required:true},																inf_field_LastName:{required:true},
			inf_field_Email:{required:true,	email:true}
				  },
			invalidHandler: function(form, validator) {	var errors = validator.numberOfInvalids();
			if (errors && isFocus) 									validator.errorList[0].element.focus();							},											submitHandler:function(form,e){								var $button =jQuery('div.infusion-submit').find('button#recaptcha_recaptchaid');							$button.removeAttr('disabled');							form.submit();						}					}); 				}); 			}			var $button =jQuery('div.infusion-submit').find('button#recaptcha_recaptchaid');		var inf_form=jQuery('form#inf_form_yourformid');					setTimeout(function(){  		if(inf_form.getVelidationMessage().length===0)			$button.removeAttr('disabled');		else			$button.attr('disabled','disabled');	}, 300);		jQuery('form :input').keyup(function(e){		jQuery(e.currentTarget).valid();		if(inf_form.getVelidationMessage().length===0)			$button.removeAttr('disabled');		else			$button.attr('disabled','disabled');	});		jQuery('div.infusion-submit').mousedown(function(topev){		if(inf_form.getVelidationMessage().length===0)					$button.removeAttr('disabled');			else			$button.attr('disabled','disabled');	});	jQuery('div.infusion-submit').on('click',function(topev){	isFocus = jQuery(topev.currentTarget).find('button').attr('id')==='recaptcha_recaptchaid'? true:false;	if(topev.currentTarget.attributes['id']==='recaptcha_recaptchaid') return;							if(inf_form.valid()){		$button.removeAttr('disabled');	}				else{		$button.attr('disabled','disabled');	}	});});</script>
Now you have successfully integrated Infusionsoft webform to Divi theme and validated it. Let us know, how did you find our article integrate Infusionsoft webform to Divi theme in the comment section below.
I appreciate, cause I found exactly what I was looking for. You have ended my 4 day long hunt! God Bless you man. Have a nice day. Bye
Thank you.
Thanks for finally talking about > How to integrate infusionsoft webform to Divi theme < Loved it!
I have been exploring for a little for any high-quality articles or weblog posts
on this sort of area . Exploring in Yahoo I finally stumbled upon this web site.
Studying this info So i am glad to exhibit that I have an incredibly just right uncanny feeling I discovered exactly what I
needed. I so much indubitably will make certain to don?t fail to remember
this web site and give it a look on a relentless basis.
Hey there! I know this is kinda off topic nevertheless I’d figured
I’d ask. Would you be interested in exchanging links or maybe guest writing
a blog article or vice-versa? My blog goes over a lot of the same subjects as yours
and I think we could greatly benefit from each other.
If you happen to be interested feel free to send me an e-mail.
I look forward to hearing from you! Fantastic blog by the way!